When Your Hardened Setup Breaks Your Own Bot — And How to Fix It Like a Pro
After updating OpenClaw on a hardened Raspberry Pi, two errors appear: permission denied on .bashrc and a systemctl --user failure. Neither means something is broken — both mean your isolation is working. Here's why they happen and how to fix them cleanly.
Part 2(This one): Updating your Openclaw installation on Raspberry Pi
Part 3: Installing OpenClaw Skills on a Hardened Raspberry Pi
If you followed the previous part of this series, you now have a Raspberry Pi that is:
- Invisible to the public internet
- Running OpenClaw under an isolated system user
- Protected by a firewall, Tailscale, and a hardened systemd daemon
And then you tried to update OpenClaw — and things started breaking.
Good. That means it is working.
This post walks through exactly what broke, why it broke, and how to fix it without weakening a single layer of the security you spent time building.
Step 1: Access the OpenClaw Dashboard
Before running updates, let's make sure you can actually see what OpenClaw is doing through its dashboard.
From your Pi, switch into the openclaw user and check the gateway:
ssh rpi@<tailscale_ip>
sudo -u openclaw -H bash -l
cd /opt/openclaw
openclaw gateway status
openclaw dashboard
Since the gateway binds to loopback, it is not directly reachable from your laptop's browser. To access the dashboard remotely, open an SSH tunnel from your laptop first:
ssh -L 18789:127.0.0.1:18789 rpi@<tailscale_ip>Then open this in your browser:
http://127.0.0.1:18789/Finding Your Gateway Token
When the dashboard asks for authentication, it needs your gateway token — the credential that controls access to the control panel.
Switch to the openclaw user and run:
cd /opt/openclaw
grep -n '"token"' /opt/openclaw/.openclaw/openclaw.json
You will find it under gateway.auth.token. Copy it, paste it into the dashboard auth prompt, and you are connected.
🔒 Keep this token private. It is the only credential protecting your gateway from unauthorized access. If you ever need it on the go, you can also ask your Telegram bot directly — it will return the command to retrieve it.
Step 2: Running the Update
To update OpenClaw, switch to the openclaw user and run:
sudo -u openclaw -H bash -l
cd /opt/openclaw
openclaw update
You will see a doctor warning at the top of the output:
channels.telegram.groupPolicy is "allowlist" but groupAllowFrom (and allowFrom) is empty —
all group messages will be silently dropped.
This is not an error. It is a security notice telling you that if your bot is ever added to a Telegram group, it will silently ignore all group messages. That is the intended behaviour for a private setup. You can safely ignore it unless you specifically want group access.
The update itself will run and complete successfully:
Update Result: OK
Before: 2026.3.1
After: 2026.3.1
Total time: 270.57s
Then OpenClaw will ask:
Shell completion
◆ Enable bash shell completion for openclaw?
● Yes / ○ No
This enables tab-completion for OpenClaw commands in bash — for example, typing openclaw ga and pressing Tab auto-completes to openclaw gateway. Select Yes. It is a useful quality-of-life feature and completely safe.
And then this appears:
Installing completion in /opt/openclaw/.bashrc...
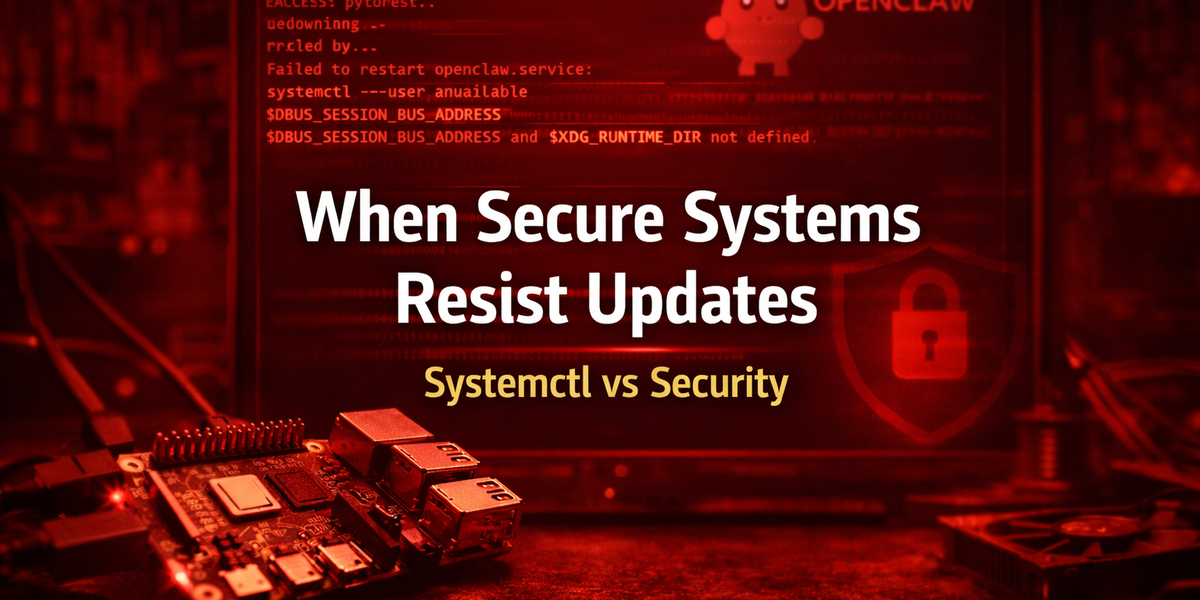
Failed to install completion: Error: EACCES: permission denied, open '/opt/openclaw/.bashrc'
Restarting service...
Gateway service check failed: Error: systemctl --user unavailable:
Failed to connect to user scope bus via local transport:
$DBUS_SESSION_BUS_ADDRESS and $XDG_RUNTIME_DIR not definedBefore anything else — your update succeeded. Everything failing here is post-update automation, not OpenClaw itself. These are two separate, fixable friction points caused by your hardened design.
Step 3: Fix the `.bashrc` Permission Error
EACCES: permission denied, open '/opt/openclaw/.bashrc'At some point during the original setup, commands run with sudo — the installer, sudo nano, or the onboarding wizard — created .bashrc owned by root instead of openclaw. So when the updater tried to write shell completion into it, Linux refused.
First, confirm this is the problem. Run as the rpi admin user:
ls -l /opt/openclaw/.bashrcIf you see root root in the ownership column, that confirms it.
sudo chown openclaw:openclaw /opt/openclaw/.bashrc
sudo chmod 644 /opt/openclaw/.bashrc
Verify it worked:
ls -l /opt/openclaw/.bashrcYou should now see openclaw openclaw.
✅ This is safe. You are not weakening your security model — you are correcting a file that was never supposed to be owned by root in the first place. The entire
/opt/openclawdirectory is OpenClaw's sandbox. It should own everything inside it.
Step 4: Fix the `systemctl --user` Error
systemctl --user unavailable
$DBUS_SESSION_BUS_ADDRESS and $XDG_RUNTIME_DIR not defined
This one is not just fixable — it is expected forever in your setup, and it actually confirms you built things correctly.
OpenClaw's updater assumes it is running as a user-level systemd service, which requires an active desktop session and a DBUS session bus. But you set it up as a system-level service under /etc/systemd/system/openclaw.service — which is the correct approach for a headless server. A headless Pi with a system user has no DBUS session, so this restart attempt will always fail.
The correct response is to simply restart the service manually after every update:
sudo systemctl restart openclaw
sudo systemctl status openclaw
You can tell OpenClaw to stop attempting user-level restarts entirely by editing its config:
sudo nano /opt/openclaw/.openclaw/openclaw.jsonAdd or modify:
{
  "service": {
    "mode": "system"
  }
}
Save and restart the service. Newer versions of OpenClaw may auto-detect this eventually, but setting it explicitly removes the confusion now.
Step 5: The Complete Post-Update Recovery Sequence
Run this from your rpi admin user after any update that triggers these errors:
# Fix .bashrc ownership if needed
sudo chown openclaw:openclaw /opt/openclaw/.bashrc
sudo chmod 644 /opt/openclaw/.bashrc

# Restart service correctly
sudo systemctl restart openclaw
sudo systemctl status openclaw --no-pager
Then switch back into the openclaw user and verify the environment:
sudo -u openclaw -H bash -l
node -v
openclaw --version
If both return expected version numbers, your setup is fully healthy.
Your System Status After This
At this point, your Raspberry Pi has:
- ✅ Node runtime stable (v22)
- ✅ OpenClaw updated and running
- ✅ systemd daemon active and supervised
- ✅ Resource limits enforced
- ✅ Git working for self-modification
- ✅ Telegram bot connected
- ✅ Loopback-only dashboard access
- ✅ Tailscale-only remote entry point
The infrastructure is done.
Why These Errors Were Actually a Good Sign
Most OpenClaw tutorials run the agent under a regular user with no isolation, no permission separation, and no service boundary. In those setups, these errors would never appear — because the agent already has unrestricted access to write wherever it wants.
The fact that you hit these errors means your filesystem permissions are enforced, your service isolation is intact, and your user boundary is real.
You were not debugging a broken system. You were debugging a secure one — which is a completely different and far more valuable problem to solve.
If nothing ever gets blocked, nothing is truly being guarded.